
Note: This post is for informational purposes only. Garage door torsion springs can be very dangerous if not handled properly. We recommend you hire a trained professional to repair your garage door springs.
Replacing torsion springs in your garage door requires a good bit of elbow grease and some know-how, but, if performed correctly without injuring yourself or your garage door, can provide the satisfying feeling of a job well done.
Check out our detailed guide on how to replace a garage door torsion spring. We include step-by-step instructions and a few helpful hints, so you know exactly what it takes to get the job done right.

Step 1: Safety Precautions
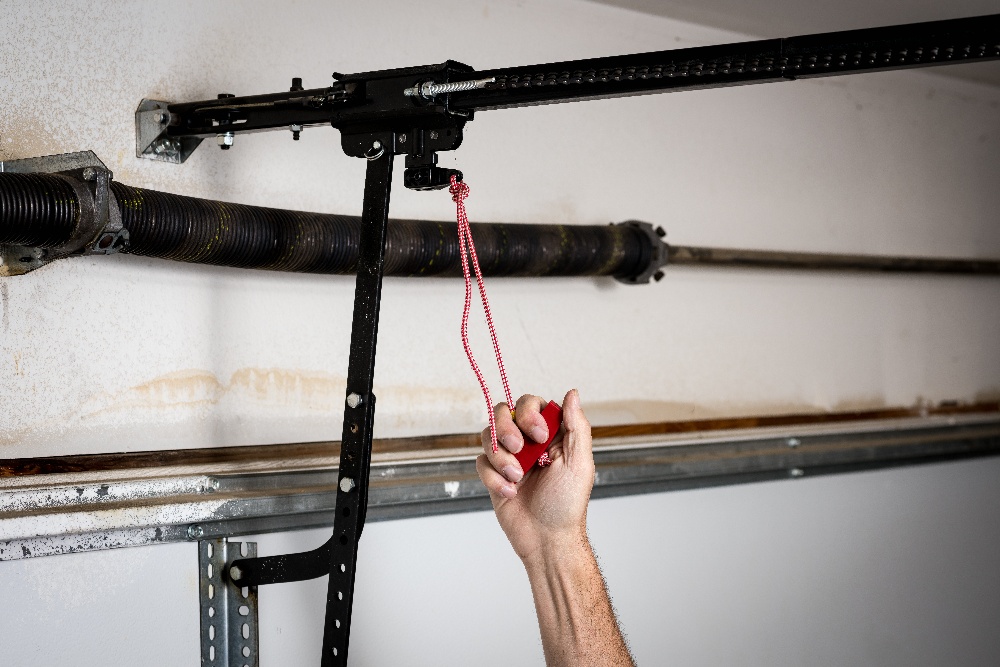
Making sure that your garage door doesn’t fall suddenly, or that you don’t suffer an electric shock, is priority one. Close your garage door, pull the brightly-colored release cable to release the door, and unplug the motor unit from the power source.
Then, place a vice grip on the track, about halfway up the garage door, to prevent the door from opening unexpectedly if you wind the torsion springs up too tightly later on.
Step 2: Dismantle the Current Springs
.jpg?width=1280&name=Puls%20Day%202025%20(1).jpg) For this job, you’ll need a 7/16” wrench or a 3/8” socket, along with a pair of certified winding bars. Don’t be tempted to use the rebar you’ve got lying around, or any other replacement, as it can snap and cause serious injury.
For this job, you’ll need a 7/16” wrench or a 3/8” socket, along with a pair of certified winding bars. Don’t be tempted to use the rebar you’ve got lying around, or any other replacement, as it can snap and cause serious injury.
Unwinding the spring:
-
Stick the winding bar into the higher tube in the torsion spring cone – you want to be holding the winding bar up higher than shoulder level so you can control it when it starts to want to come down. Then, using your wrench or socket, loosen the set screws that are holding the torsion spring in place.
-
As you loosen the set screws, you’ll feel pressure increasing on the winding bar you’re holding. When the screws are fully loosened, bring the winding bar down, nice and easy, until it’s resting against the garage door.
-
Then, insert your second winding bar securely into the higher tube in the winding cone, remove the lower winding bar that’s resting against the garage door, and slowly let down the second winding bar, just like you did the first. Keep going like that until the spring is free of tension – about 30 quarter-turns for a 7-foot garage door. Repeat the process for the second garage door torsion spring.
Undo the bearing and drums:
-
The two torsion springs are joined in the middle by some bolts and a bearing. With a 9/16” wrench, loosen the bolts and wiggle the springs free.
- Then, loosen the bolts on the cable drum located at the far end, close to the edge of the garage door on either side of the bar holding the torsion springs. Let the cable slide out, and repeat for the second cable drum on the other side.
- Get up on the ladder, and pull the bar loose from the bracket. It should come out pretty easily. This will allow you to lower the bar and let the cable drum and torsion spring slide right off. Repeat on the second side.
Step 3: Put the New Spring Back On
To put the torsion springs up, first check which way the spring is coiled by looking at the top of the spring and checking whether the coil runs clockwise or counter-clockwise.
The clockwise spring is right-hand wind, and goes on the left side. The spring whose coil runs counter-clockwise is a left-hand wind, and goes on the right side.
Take the new spring, slide it on the bar, followed by the cable drum, and pop the bar back into the bracket. Repeat on the second side.
Put it back together
- Then, rejoin the two springs in the middle with the plastic bearing between them. Making sure you’ve got a vice grip handy, reinsert the cable into the cable drum and wind it towards yourself, stopping when there is still some slack.
- Push the drum sideways back against the bracket, reinsert the set screws and tighten them, then clamp the vice grip on the bar with the handle against the ceiling, so that the bar doesn’t spin when you let go. Repeat on other side.
Tighten the torsion springs
- In a similar but opposite motion than you did to loosen the springs, insert the winding bar into the winding cone and give a quarter turn upwards, then, when you’ve got the winding bar raised, stick the other winding bar into the lower hole on the winding cone, so that it’s leveraged against the garage door and won’t let the spring uncoil. Repeat about 30 times until the spring is fully wound.
- Tighten the set screws – tighten until you feel it hit the bar, then give another half turn. Do the second set screw, then come back and give each one an additional quarter turn.
- Now, with the lower winding bar still in, insert the higher winding bar and hold it up securely – be prepared for the possibility that there might soon be pressure on it if everything isn’t tightened properly. Then, remove the lower winding bar, and slowly bring down the higher winding bar, testing to see that the springs and cables are secure and your spring doesn’t want to uncoil. Repeat on second side.
- Remove the vice grip from the bar, as well as the one that you put on the track halfway up the garage door. Lift the garage door from the middle, checking to see if it’s balanced. If the garage door is trying to open up on its own, loosen the springs one or two quarter turns.
You Can Count on Puls
Nobody is better at replacing torsion springs than Puls.
With Puls, you’re in good hands - we’re here to make things easy. There’s no pressure, no hidden fees, and everything is as seamless and transparent as possible - pay for your repair only after the process is complete.
You can simply hop online to book a torsion spring replacement within seconds, and you can have someone at your door to fix it within the same day. For just $39, our skilled technicians will come perform a thorough, 25-step inspection of your door before you opt for a complete repair, to pinpoint exactly what the issue is, and give you a proper, adequate price quote. And if you go ahead with the repair through Puls, we’ll waive the $39 inspection fee.
All of our parts and labors come backed by our 90-day guarantee, meaning that we’ll come back to you again should anything happen, for free, even long after your repair. Our skilled repair experts will bring all the necessary safety equipment, tools, and parts to you, so all you’ll have to do is sit back, relax and let us handle the rest - it’s really that easy.
So, what’re you waiting for? Book a garage door repair online to have our technicians come perform a thorough in-home diagnostic within the same day. You can even click here to get 5% off your first service with us.

