How to Mount a TV on the Wall: Step-By-Step Guide

offer_banner_mobile
All Posts

Today’s televisions are bigger, lighter, and clearer than ever before—the old 32”, 40” and 50” flat-panel screens are being replaced so that 60”, 70”, and even 90” TVs are becoming more common. They provide more high-definition entertainment too—streaming, gaming, music, and of course, TV programming. With smaller, light-weight components, these mega-sized marvels are easier to mount on the wall, so we’ve put together a step-by-step guide on “how to mount a TV” if you want to do it all yourself. Not to worry if the job seems a little intimidating, a Puls’ technician can take care of all the heavy lifting for you with a same-day appointment.

Book TV Mounting Now


Know how to prep your walls? Click here to go directly to the step-by-step instructions.

8 Things to Consider Before You Mount a TV on the Wall 

Regardless of size or style, there are a few things you need to figure out before you start drilling holes in the wall:

1. Check the Specifications of Your TV


It’s important to consider the size and weight of your TV so you get the right wall brackets. Mounting brackets are rated by both screen size and weight capacity. Make sure to check your television’s manual for the exact dimensions and weight of your model. Then compare the wall mount product description to make sure it is capable of holding your unit.

  • Make sure the brackets don’t extend past the width and height of your TV.
  • Curved televisions may need a special mount to offset this configuration.
  • The larger the TV, the heavier it will be. Don’t max out the weight capacity of the mounting bracket. Doing so will compromise the integrity of the mount and possibly create a dangerous situation. 

2. Plan Where to Locate Your TV

Finding the ideal location for your TV depends on several factors including viewability, angle, window location, space allowance, furniture placement, component placement, electrical and cable access. While you might be able to move furniture around or use a different type of bracket to angle the television, planning ahead will provide the best possible outcome.

  • Calculate the proper distance from the seating area. The general rule is to divide the size of your TV by 0.55. With this formula, you’ll need to sit 109 inches away from your set. You can also use this online calculator to determine the proper distance.
  • Think about the equipment you’ll need to operate your TV. Small cable boxes may be small enough to mount on the back of the unit but larger components may need to be located below or to the side of your TV.
  • If windows are located directly opposite the TV, daytime glare may obstruct viewability. Consider relocating to another wall or add window treatments that block bright light.
  • Many people are now putting flat-panel TVs above fireplaces. Caution should be taken to redirect excess heat with a deep mantle or an alcove that will protect the set.

3. Decide How High the Wall-Mounted TV Should be Placed

The standard mounting distance from the floor to the center of the television is 42 inches. This takes into account the eye level of a person of average height sitting on a sofa or chair. The TV should be placed at least 4 to 6 inches above any furniture and 18 inches above a fireplace opening.

  • Don’t place the TV too high or you’ll risk neck strain from looking up. Your eyes should be in line with the top third of the TV when standing.
  • Wall-mounted televisions appear to look smaller than table-top mounts. The trend to larger models fills the need for a more interactive viewing experience.
  • A TV mounted at the proper height frees up floor space, provides better viewing for multiple seating arrangements, and keeps electronics safely away from children and pets.

4. Identify the Best Mount Size for Your TV

It’s important to purchase a mounting bracket that will perform as needed while securing the TV without falling. Fixed wall mounts are typically the least expensive but you should be aware of differences between models.

  • Larger screen sizes require stronger TV mounts. While higher-priced models don’t automatically indicate superior quality, there may be a difference in the metal thickness and weight capacity.
  • Check that all necessary tools are included such as hardware, level, HDMI cables, and mounting templates. Some higher-priced models may also include a cable organizing component.
  • All TV mounts should be UL-certified for high quality standards.
  • Most of today’s mounting brackets are designed to handle between 80 and 125 pounds. Make sure to check the manufacturer’s recommendations on both your TV and the mounting bracket description.

5. Find Out If Your Wall Can Sustain the TV


Most TVs are installed through drywall into wood studs with a single-stud or dual-stud mount. Studs are generally spaced 16 inches apart, although there may be some 24-inch spacing. Check the wall plate capacity—some accommodate both stud spacing.

    • Some styles offer an adjustable offset so you can center the TV wherever you need.
    • Special hardware is required for concrete or brick installation.
    • In areas where stud installation is not available, you can hang a TV with toggle bolts. Hollow wall anchors look like a normal screw with a butterfly toggle that opens on the inside of the drywall to secure the mount.

6. Plan Beforehand on How to Manage the Wiring and Cables

Whether you connect your TV through Wi-Fi or have numerous pieces of equipment like cable boxes, DVRs, surround sound soundbar speakers, and game systems, you’ll need to make a plan for concealing cords.

  • A simple cord cover is a channel used to run cords straight down from the TV to the wall. Most are paintable to blend into the wall color for a streamlined look.
  • Use wall power kits to run cables inside the wall down to the electrical outlet.
  • A single cord connection, One Connect, works with specific TVs with a controller box. All devices run off this without having to plug into your TV.

7. Thoroughly Research to Find the Best Wall Brackets and Mounts

Wall mounts come in three main types—fixed, tilt, and full-motion. You also need to understand what type of mounting pattern your TV uses called a VESA pattern.

  • Fixed—this mount sits close to the wall and holds the TV securely.
  • Tilt—used to reduce glare and angles when the TV is mounted higher on the wall.
  • Full-Motion—offers flexibility and multiple viewing angles. Provides easy access to cables and tilts, swivels, and rotates.
  • VESA Pattern—the mount must have the same VESA pattern as your TV. The pattern of mounting holes are measured in millimeters such as 100x100, 200x200, 400x400 and will line up with the appropriate mounting brackets.

8. Availability of Source of Power Near Your Mounting

Before purchasing your wall brackets, check for electrical outlets as well as the location of the power cord on the back of your TV. You may need to use a power strip with additional ports for multiple devices. Consider using a surge protector guard against damaging electrical surges.

Use the Right Tools

You should make sure you have the right tools available for a seamless installation:

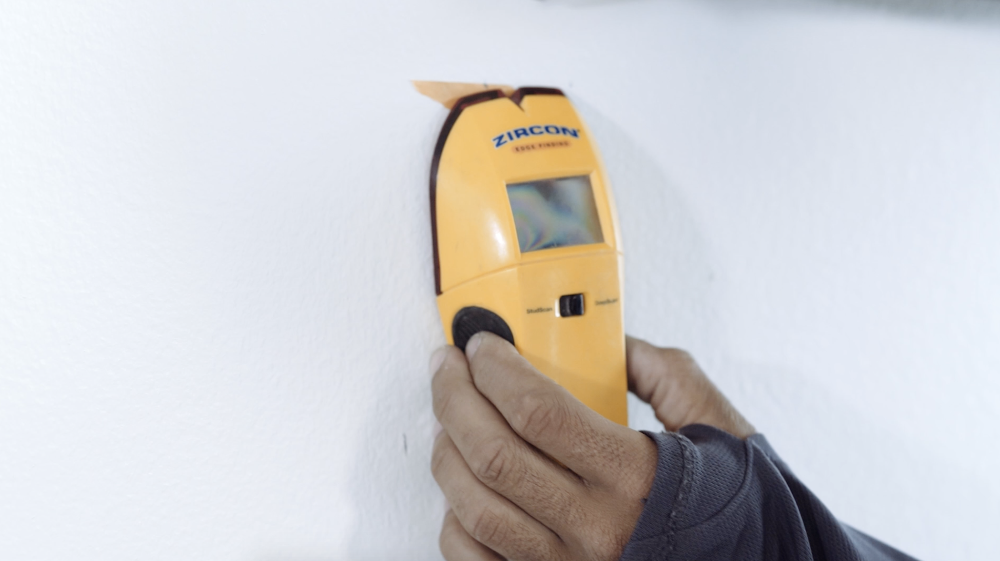
  • Stud finder—to find the wood wall studs inside the walls.
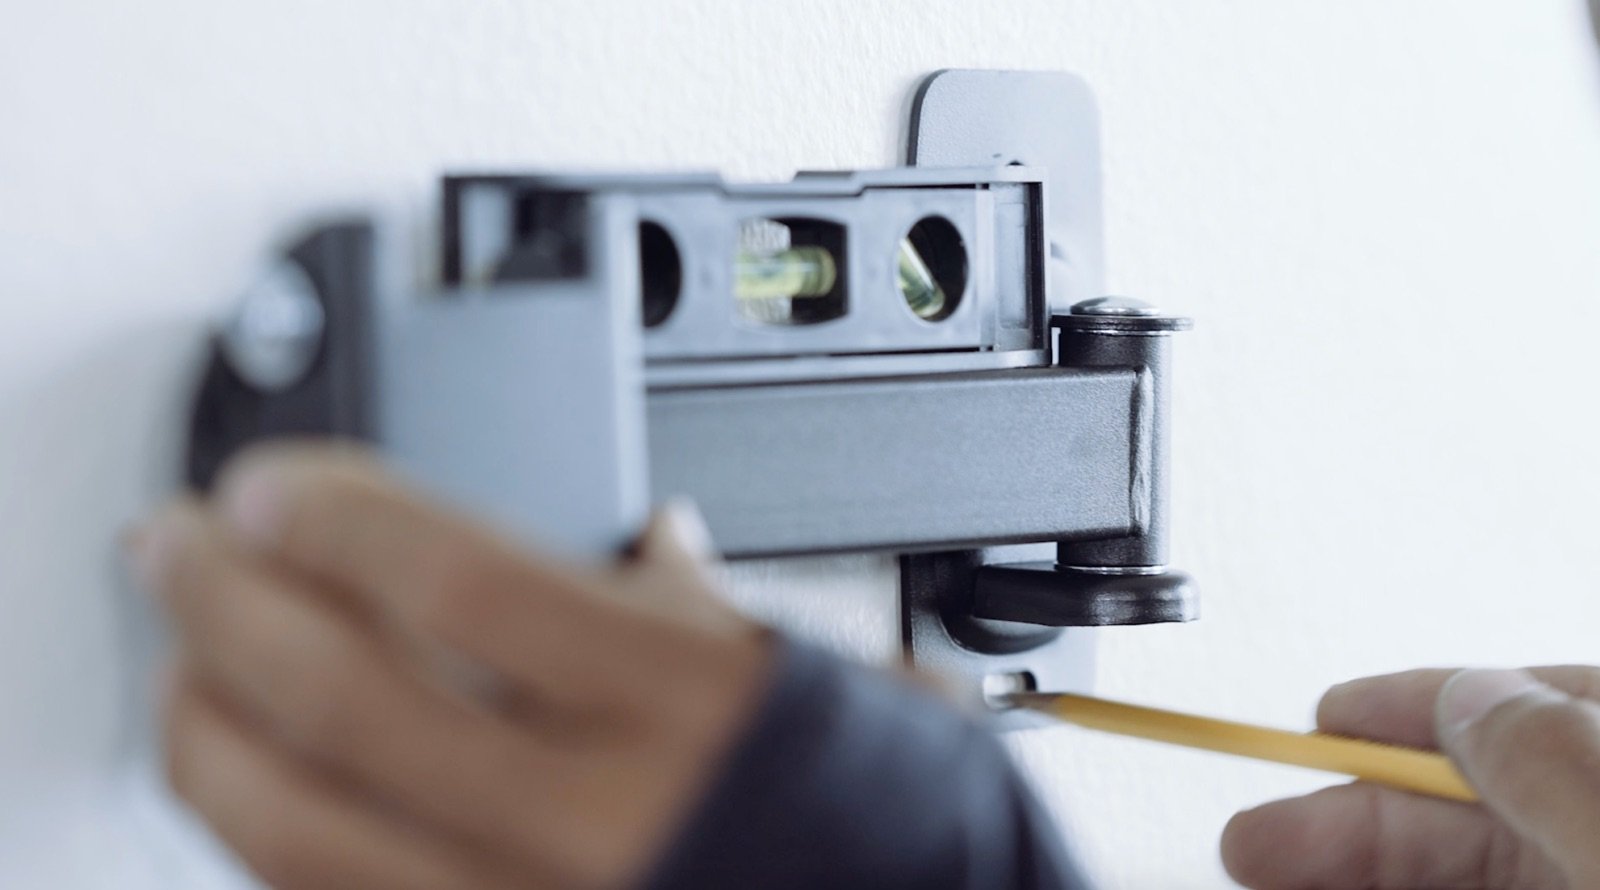
  • Level—to make sure the mount is level on the wall.
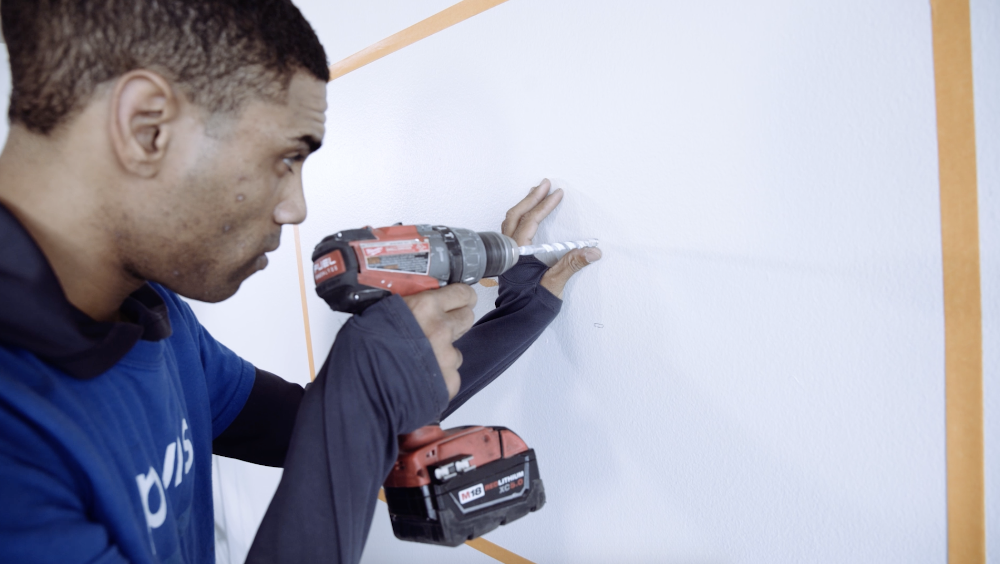
  • Power drill and bits—to install the hardware.
  • Pencil—to mark the hole pattern on the wall.
  • Painter’s tape—to mark the TV placement on the wall.
  • Tape measure—to locate the proper height and distance on the wall.
  • Hardware—additional screws and bolts needed for installation.
  • Cable management system—ties, cord cover, etc.
  • Wall mount—with instructions and appropriate hardware.

How to Mount the TV on the Wall: Step-by-Step

Step 1: Locate the Wall Studs

That basically means you need to figure out where the wooden support beam is behind your wall, so you can drill into the wood and not into the hollow drywall (drywall alone typically cannot support the weight of the TV without special toggle bolts.)

How to Mount a TV - Use a Studfinder-1-1

Step 2: Make Sure the Template is Straight

Create a “target” with painters tape. Once you’ve decided where the TV should go, give yourself a visual guide by laying down some tape (which can be removed later). Your tape measure can help in creating a target that’s the correct size. You’ll use the tape as a reference while mounting your TV.

How to Mount a TV - Use Place Tape on the Wall -1Now it’s time to drill!

Step 3: Mark exactly where the screws will go

Hold the mount against the wall on top of the stud and use a pencil to mark where the screws will go. This will be your blueprint.

How to Mount a TV - Use Pencil to Mark Holes

Step 4: Use the drill to pre-drill the holes in the stud

Take the drill and drill some empty holes into the wall where you have made pencil marks for each screw.

How to Mount a TV - Pre Drill the Holes in the Wall-2

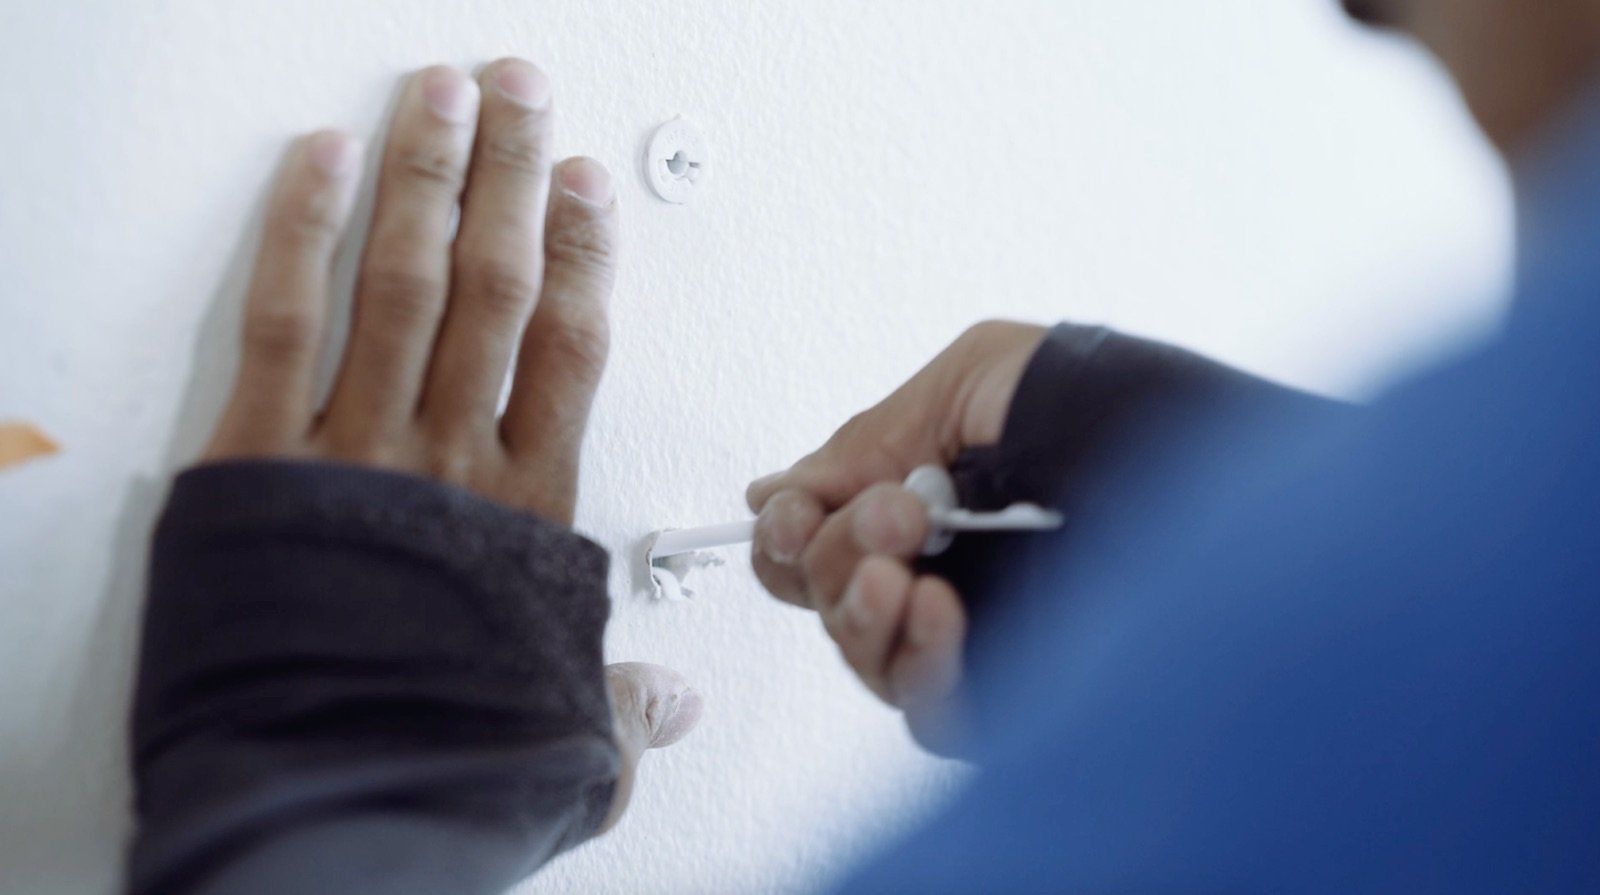
Step 5: Install “strap toggle bolts” in each hole
 

If you’ve never heard of a strap toggle bolt, it’s a handy item that helps to anchor your screws in the wall. It can be purchased at most hardware stores and installed very easily. 

How to Mount a TV - Put in Strap Toggle Bolts

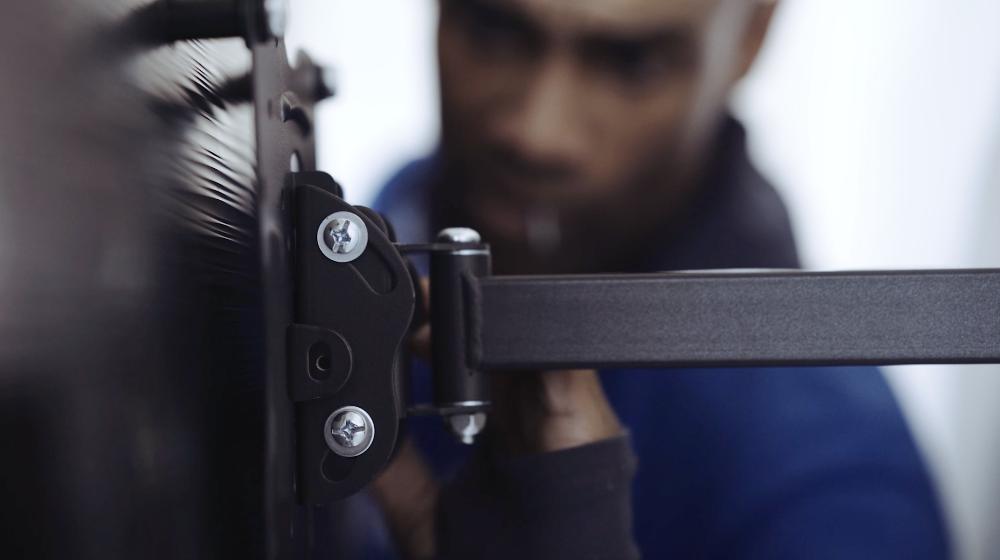
Step 6: Hold the mount against the wall drill in the screws

Leave the screws slightly loose while you adjust the placement of the mount, then come back and tighten them.

How to Mount a TV - Drill Screws Into the Wall-2

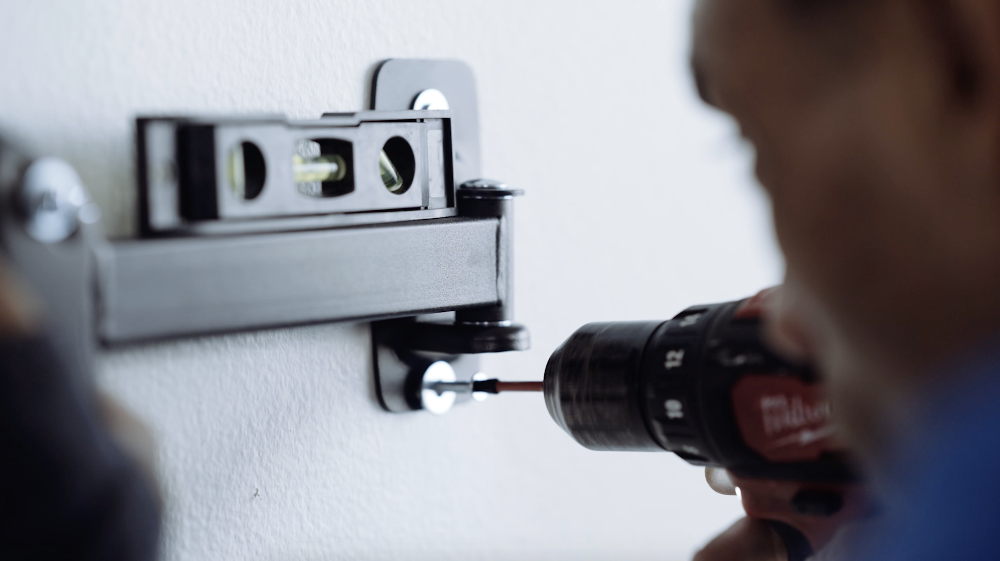
Step 7: Use a leveler to ensure the mount (and TV) will be level 

The leveler is a handy tool that will show whether your mount is crooked. Place the leveler on the mount and look to see if the air bubble is directly in the middle of the crosshairs. The last thing you want is a crooked TV!

Step 8: Place the TV on the mount

Make sure the mount is secure before trusting it to hold the weight of your TV. Once the TV is on the mount, take a look to see if it appears level and then screw it securely into the mount.

How to Mount a TV - Tighten Screws to Secure TV to the Mount-1

Step 9: Conceal your TV cords

Most people don’t want the cords hanging down since it looks a bit messy. There are two main ways to conceal them: internal or external. Internal concealment requires installing them behind the drywall, which can be done by a professional technician from Puls. An external concealment kit can be purchased at a local hardware store.

Step 10: Clean up and enjoy! 

Once you’ve swept up any paint chips or dust from the drilling, you’re all done, so get ready to watch your favorite shows on a beautiful, new high quality television.

Top TV Mounting Styles You Can Choose From

Fixed Mount—offers a compact size for a streamlined look. It is light-weight and easy to install. It is inexpensive and can support heavy TVs.

Full-Motion/Tilting Mount—provides greater viewing angles and can adjust up to 15 degrees. It is an affordable product that can accommodate most TV sizes.

Articulating Mount—offers the most wide range of motion for ultimate viewing angles. Limited weight capacity.

Slim Mount—low profile brackets stay hidden for a sleek look with ultra-slim TVs.

Under-cabinet Mount—save counter space with a flip-up mount. This fits under cabinets to keep the screen out of sight when not in use.

Platform Mount—made for older CRT-style TVs and does not fit flat-screen models. The TV is placed on the shelf and is supported by a wall mount.

Cantilever Mount—the most flexible style. It pushes in and out and can be used to extend the TV from an alcove or corner.

Ceiling Mount—great for bedrooms and small spaces. Can easily be installed in the corner of a room, rotates well and extends towards the floor.

Do I have the Right Kind of Walls for TV Wall Mounting?

While the most common type of wall materials used today is drywall over wood studs, there are many different types of walls that you may want to mount a TV on. Here are some of the most popular styles:

  • Brick—very versatile for most any size TV but be sure to mount into the brick, not the mortar. Use heavy-duty wall anchors made for brick.
  • Concrete—made from stone, sand, cement, and water. Installation is more complicated and may require drilling combined with plastic or metal anchors for the bolts.
  • Stone—natural granite, marble, slate, tile, etc. Mounting should be done by a professional installer as it may require diamond drill bits to reduce cracking and extra support to hold the wall plate in place.
  • Wood—this is the easiest material for TV mounts as every surface can be used. There is no need to locate studs.
  • Siding—cement board, aluminum and vinyl that is used in exterior installations are especially challenging. Locating the studs behind the wall is extremely difficult as a stud finder is not accurate due to electrical wires inside the walls.
  • Stud—typical wood frame construction behind drywall or plasterboard. Use a stud finder to locate studs to affix the mounting brackets.

FAQ

Does mounting a TV damage the wall?

Yes, mainly due to holes that must be drilled to hold the mounting bracket. That’s why it is so important to mark the holes prior to drilling to avoid unnecessary damage.

How much does it cost to have a TV mounted on the wall?

Professional TV mounting starts at $109 with Puls plus the cost of the bracket.

Is it better to wall mount a TV or put it on a stand?

While using a TV stand is faster and easier, wall mounting provides greater flexibility, viewability, and can provide a safer environment for children and pets with lower risk of falling over.

Can you mount a TV on the wall by yourself?

Yes, follow the step-by-step instructions provided in this post.

Can my walls hold a television?

Most wall materials are adequate for TV mounting.

How to wall mount a TV without drilling holes?

No, small holes used for a no-stud hanger mount are the least damaging but will limit the size of the TV due to maximum weight restrictions.

Puls can cover your TV installations from A-Z

If you're not particularly handy or you simply don't feel like dealing with all the heavy lifting and drilling, it's important to remember that self-installation certainly isn't for everyone. That's why we're here to make things easy.

Our skilled technicians will do all the drilling, lifting and technical configuration for you, so you can simply sit back, relax and get ready to enjoy your newly mounted TV. We can even help you conceal wires, mount shelving and sound bars, or hook up devices like your XBOX.

Simply hop online and book an appointment with our expert technicians at a time that works best for your busy schedule. We can be there within the same day to make things as seamless and convenient as possible.

Book TV mounting

Debbie D.
Debbie Dey is a professional writer with over three decades of experience in residential construction. Her background gives her a wealth of knowledge about all kinds of home improvement projects, which she enjoys sharing through her writing. She has been a Puls staff writer since 2018. In her free time, you can find her relaxing by the water or cruising with her husband in their sports car.
Related Posts

For years, yards were treated as something separate from daily life. They were nice to look at, maybe used occasionally on weekends, and largely defined by curb appeal rather than function. As long as the grass was cut and things looked tidy from the street, the yard felt “done.” That perspective is changing. Today, homeowners are increasingly treating their yards as active living spaces—places to relax, gather, work, and unwind. This shift isn’t driven by trends alone. It reflects deeper changes in how people use their homes and how much they value spaces that support everyday routines. Yards are no longer just outdoor extras. They’re becoming part of how homes actually function. From Occasional Use to Everyday Space One of the biggest changes in yard use is frequency. Instead of being reserved for special occasions, yards are now part of daily life. Homeowners are using their yards for: Morning coffee or quiet breaks Casual meals and family time Light exercise or stretching Kids’ play and downtime Evening wind-down routines As usage increases, expectations change. A yard that’s used regularly needs to feel accessible, comfortable, and easy to maintain. Comfort Is Driving Yard Design Choices Modern yard use is less about show and more about comfort. Homeowners aren’t trying to create magazine-perfect outdoor spaces—they want areas that feel welcoming and usable without a lot of effort. Comfort-focused choices include: Defined seating areas Even, safe walking surfaces Practical lighting for evenings Thoughtful placement of furniture and features When yards are set up with comfort in mind, they naturally become places people want to spend time. Lighting Is a Key Enabler of Use Lighting has become one of the most important elements in how yards are used. Without good lighting, outdoor spaces tend to disappear after sunset. With it, they remain part of daily life. Homeowners are prioritizing: Pathway lighting for easy movement Soft ambient lighting for seating areas Functional lighting near entrances or work zones Well-planned outdoor lighting extends usability without changing the character of the space. Yards as Low-Pressure Social Spaces Another shift is how yards are used socially. Instead of formal gatherings, homeowners are leaning into casual, low-pressure outdoor time. This might look like: Quick dinners outside Neighbors stopping by Kids playing while adults relax nearby These moments don’t require elaborate setups—they just require spaces that feel ready and inviting. The Rise of “Functional Zones” Rather than treating the yard as one large open area, homeowners are increasingly dividing it into functional zones. This mirrors how indoor spaces are used. Common yard zones include: A seating or lounging area A dining or grilling spot A play or activity space A storage or utility area Zoning helps yards feel organized and intentional, even without major landscaping changes. Maintenance as Enablement, Not Chores As yards become more integrated into daily life, the way homeowners think about yard care is changing. Instead of viewing maintenance as a chore, it’s seen as something that enables use. Care is focused on: Keeping walkways clear and safe Ensuring features are stable and secure Maintaining lighting and access points This approach keeps yards usable without turning upkeep into a constant project. Outdoor Power and Connectivity Matter More With increased yard use comes a greater need for power and connectivity. Outdoor speakers, lighting, work tools, and occasional devices all benefit from thoughtful electrical access. Homeowners are paying attention to: Convenient outdoor outlets Secure mounting for fixtures Safe routing of cords and connections Professional installation ensures these elements are handled cleanly and reliably. Storage Is Part of Yard Functionality Yards often support a mix of activities, which means storage matters. Homeowners are using sheds, cabinets, and designated storage areas to keep outdoor spaces usable without clutter. When storage is well-planned: Yards stay tidy Setup and cleanup take less time Outdoor use feels spontaneous rather than effortful This makes it easier to use the yard regularly instead of only when everything is “just right.” Yards and Home Flow Yards increasingly act as extensions of indoor space. Easy access from kitchens, living rooms, or basements makes outdoor use feel natural rather than separate. This flow is supported by: Clear entry points Well-lit transitions Stable steps, doors, and pathways When indoor and outdoor spaces connect smoothly, yards become part of the home’s everyday rhythm. Professional Help Keeps Yard Projects Simple As yards take on more roles, homeowners are choosing professional help to keep projects manageable. This isn’t about large-scale landscaping—it’s about getting the details right. Puls technicians can help with outdoor lighting installation, mounting, electrical work, and general handyman tasks, making it easier to create yard spaces that feel intentional without adding complexity. Seasonal Changes Without the Stress Modern yard use adapts naturally to the seasons. Instead of major seasonal overhauls, homeowners are making small adjustments that keep yards comfortable throughout the year. This might include: Adjusting lighting as days shorten Reconfiguring seating for cooler weather Preparing access points for different conditions Because the yard is already part of daily life, these shifts feel simple rather than disruptive. Yards as a Buffer Between Home and World Another reason yards are gaining importance is the sense of separation they provide. They offer outdoor space without leaving home—a buffer that supports relaxation and presence. This role has become especially valuable as people look for ways to step outside briefly without planning an outing. Yard Care and Long-Term Home Enjoyment While resale value isn’t always the goal, yards that are easy to use and well cared for tend to enhance long-term enjoyment of the home. A yard that feels ready—rather than demanding—encourages more frequent use and adds to the overall sense that the home is well run. Why This Shift Is Happening Now Several broader trends are shaping how yards are used: More flexible schedules Greater focus on home-based routines A desire for everyday comfort over formality Yards fit naturally into this evolution, offering space, flexibility, and connection without expansion. The Future of Yards in Modern Homes Looking ahead, yards will continue to be shaped by usability rather than aesthetics alone. Homeowners will focus on: Comfort and access Thoughtful lighting Reliable setup and support Yards that are easy to use will always be used more often. Making the Yard Work for You Yards don’t need to be elaborate to be valuable. When they’re comfortable, accessible, and supported by professional care, they quietly enhance daily life. Calling a Puls technician for yard-related improvements or installations helps homeowners create outdoor spaces that feel ready when they’re needed—without turning yard care into a project. A New Role for an Old Space The modern yard isn’t about perfection. It’s about usefulness. It’s a place to step into briefly or stay awhile, to gather or to pause. As homeowners continue to rethink how they use their space, yards are stepping into a new role—not as extras, but as everyday living areas that support modern life.

  • 10 min read
  • 05/18/26

Home maintenance can feel overwhelming when it’s framed as one endless checklist. When everything seems important at once, it’s easy to delay action altogether and hope nothing urgent pops up. A room-by-room strategy makes home care feel more manageable. Instead of thinking about your home as one big project, you focus on individual spaces. This makes it easier to notice small changes, address issues early, and avoid the kind of problems that grow quietly over time. Kitchen: Where Wear and Tear Adds Up Fast Kitchens combine water, electricity, heat, and daily use, which naturally increases the chances of things wearing down. Under-sink leaks, loose outlets, and aging fixtures are common early warning signs. Because many kitchen components are tucked away inside cabinets, small problems often stay hidden until damage spreads. Catching these issues early keeps repairs simpler, faster, and far less expensive. Bathrooms: Constant Moisture, Constant Risk Bathrooms deal with daily humidity, which puts ongoing stress on plumbing connections, fixtures, and surfaces. Slow drains, loose faucets, or subtle discoloration around fixtures are often the first signs that something needs attention. Moisture-related issues rarely resolve on their own. Addressing them early helps prevent mold growth, water damage, and structural problems that can disrupt your home and budget. Living Areas: Subtle Signals Matter In living rooms and bedrooms, maintenance issues often show up visually or electrically. Small wall cracks, flickering lights, or loose mounted items can indicate settling, wiring wear, or anchor problems inside the walls. Because these changes happen gradually, they’re easy to normalize. Paying attention early keeps fixes straightforward and prevents damage from spreading behind the scenes. Entryways and Hallways: High Traffic, High Stress Doors, frames, and walls in high-traffic areas experience constant movement and pressure. Sticking doors or shifting frames can be early signs of alignment issues or normal structural movement that needs adjustment. Handling these issues early keeps everyday wear from turning into long-term damage that affects multiple rooms. Laundry Areas: Small Spaces, Big Impact Laundry hookups are one of the most common sources of unnoticed leaks. Hoses, valves, and drains wear down slowly, and even minor drips can lead to significant water damage if left unchecked. Because laundry areas are often out of sight, problems here tend to go unnoticed longer than they should. Regular inspection and timely service can prevent costly flooring and wall repairs. Why a Room-by-Room Approach Works Breaking maintenance down by room helps homeowners feel more in control of their home. It creates a natural rhythm for checking key areas without feeling like everything needs attention at once. This approach also makes it easier to prioritize. Rooms with water, electricity, or heavy use naturally deserve more frequent attention than low-impact spaces. How This Strategy Helps With Budgeting Room-based maintenance spreads costs out over time instead of letting them pile up into emergency repairs. Small, planned fixes are easier to budget for than sudden, expensive problems. Homeowners who take this approach often find they spend less overall—not because they avoid repairs, but because they handle them at the right moment. Peace of Mind Comes From Knowing What’s Normal When you check your home consistently, you start to recognize what’s normal and what’s new. That awareness makes it easier to spot issues early and take action without panic. Instead of wondering whether something has “always been like that,” you can make informed decisions with confidence. Where Professional Help Makes the Biggest Difference Professional technicians understand how issues in one room can affect the rest of the home. A trained eye can spot early warning signs that aren’t obvious to homeowners. Puls technicians can inspect multiple areas efficiently and handle repairs across rooms and systems, making it easier to stay ahead of maintenance without juggling multiple service providers. Why Proactive Service Is Easier Than Reactive Repairs Emergency repairs often come with stress, scheduling pressure, and limited options. Proactive service allows homeowners to plan repairs around their schedule and avoid last-minute decisions. Calling a Puls tech early helps keep home maintenance predictable, manageable, and far less disruptive. Consistency Beats Perfection Home care isn’t about fixing everything at once or chasing an ideal standard. It’s about steady attention and timely action. A professional-first, room-by-room approach keeps your home running smoothly, protects its value, and helps you avoid costly surprises down the line.

  • 5 min read
  • 05/04/26

Staying on top of home maintenance doesn’t have to feel like a constant project. Most homeowners don’t need more reminders—they need a simpler way to organize what already matters. That’s where a monthly home maintenance calendar comes in. Instead of reacting to issues or juggling long checklists, a calendar-based approach creates a steady rhythm that keeps your home running smoothly throughout the year. Why Monthly Planning Feels Easier Big seasonal lists tend to show up all at once and demand attention when life is already busy. Monthly planning spreads things out so nothing feels urgent or overwhelming. When you know exactly what to focus on each month, home care becomes more predictable—and much easier to fit into real life. How the Puls Home Maintenance Calendar Is Structured The Puls home maintenance calendar is designed to reduce mental load, not add to it. Each month focuses on just three types of tasks, keeping things clear and manageable: Quick Wins Seasonal Must-Dos Call in a Pro Tasks This structure ensures that important maintenance stays on track without turning home care into a full-time job. Quick Wins: Light Tasks That Keep Things on Track Quick wins are small, low-effort actions that help maintain comfort and performance around the home. They’re designed to be fast, easy to remember, and satisfying to complete. These tasks help homeowners feel like they’re staying ahead without committing large amounts of time or energy. Seasonal Must-Dos: Staying in Sync With the Year Every season brings small shifts in how a home is used. Seasonal must-dos help align your home with those changes in a calm, planned way. Because these tasks are anticipated in advance, they don’t come with urgency or stress. They simply support comfort, efficiency, and everyday use as the year progresses. Call in a Pro: Built-In Professional Support Some maintenance tasks are best handled by a professional—not because something is wrong, but because it’s easier and more reliable that way. Each month includes at least one Call in a Pro task, giving homeowners a clear moment to bring in expert help and keep things handled properly without guesswork. Puls technicians fit seamlessly into this system, handling professional tasks efficiently and helping homeowners stay consistent without juggling multiple providers. Why This System Reduces Stress With only three task types to think about, maintenance stays focused and manageable. There’s no pressure to do everything at once, and no feeling that something critical is being missed. Homeowners following a calendar-based approach often feel more confident simply because they know what’s coming next. Consistency Without Perfection This system doesn’t rely on doing everything perfectly. Missing a task one month doesn’t derail anything—the calendar simply brings your focus back the next month. That flexibility is what makes monthly maintenance sustainable and realistic over time. A Calmer, More Organized Way to Care for Your Home When maintenance is predictable and supported, it stops feeling like a chore. It becomes part of the background—quietly supporting comfort, safety, and daily life. A monthly home maintenance calendar turns home care into a steady rhythm, and with Puls technicians available for professional tasks, staying on top of your home feels simple, not stressful.

  • 4 min read
  • 03/23/26