There aren’t many things more exciting than unpacking that fresh new flat screen out of the box—except when you realize that it’s up to you to hang it on the wall. Although a drywall-mounted television is a great space saver and looks much sleeker than those boxy and outdated TV stands or cabinets, it does take some basic know-how to mount it safely, securely and properly.
Here’s our informative, step-by-step guide on how to mount a TV on drywall yourself.
Are you ready with everything you need and want to skip to the steps? Click here.
5 Things to Consider Before You Mount a TV on Drywall
 1. Know Your TV’s Weight
Even though modern technology has made even the biggest televisions lighter than ever, it’s critical that you use the right-sized fasteners to support the mount. Each brand and model will vary in weight, but the average 32-inch TV weighs between 25 and 30 pounds. Check your owner’s manual for the actual weight and the load capacity of the anchors you’re using to ensure it stays on the wall.
2. Check the Wall Condition
Your TV mount is only as good as its weakest link. If your drywall is ageing or deteriorating, it’s likely to bow and bend with the added weight of your television and mounting bracket. This could cause a potentially dangerous situation where the wall anchors could pull out and your TV crash to the floor.
3. Figure Out the Wall Mount to Use
Standardized patterns (VESA) have been established to ensure wall mounts fit most TVs.You’ll need to be sure that the brackets are rated for your specific size and weight. Wall mounts should never exceed the width or height of your TV. Different styles of mounting brackets will be rated for different size TVs—a fixed mount may handle a larger, heavier unit vs. a full-motion style that may max out at a lower weight capacity.
4. Check for Studs Using a Stud Finder
Most homes are framed with 2” x 4” or 2” x 6” lumber called studs. Rooms are divided with a typical standard spacing of 16” on center for interior walls and 24” on center for exterior walls. As these studs are hidden behind drywall, you’ll need to locate them (if available) with a stud finder. Lay the stud finder flat on the wall where you want to position your TV and turn it on. Slowly move it across the wall from left to right until it beeps or lights up. Note the location with a pencil mark and continue along the wall until you find the next stud. Continue this process until you’ve found all the studs where you plan to install the TV mount. If there are no studs, you’ll need to use special anchor bolts to affix your mounting bracket.
5. Decide If You Want Static or Tilted Mounts
The type of mount you decide to use will be based on your particular application and what you’d like to do. Fixed mounts (static) are attached to the wall in one position and cannot be adjusted. This is the most affordable design and easiest to install. The fixed type will work best if you plan to mount it at eye level (approximately 42” off the ground), don’t need access to the rear ports, and don’t plan on moving it.
The tilting version will work better if you intend to mount it above eye level as it gives the ability to tilt your TV screen 45 degrees down. This will give you an optimal viewing angle plus help you reduce glare and reflections from windows and lamps. It can also be pushed flat against the wall when not in use.
A full-motion TV mount pivots in multiple points to tilt, swivel, extend, and rotate your TV. It's useful to view from various seatings areas, reduce glare, and allow access to the rear TV ports and cables. It is the most expensive option and may require a more secure anchoring method than other styles due to the continuous movement. If you’re unsure about installing a full-motion mount, consider hiring a professional.
How to Mount a TV On Drywall: Step-by-Step
Step 1: Choose the Right Spot

While you may have already had a television on a stand in the room, choosing the best place for your wall-mounted unit is a little more complicated. It’s often helpful if you have another person available to assist in the placement and an extra hand when needed. Use painter’s tape (the blue stuff) to mark the position on the wall. It comes off easy without damaging the wall. Consider these points when choosing the best location:
- A central location with plenty of seating and viewing angles is the best.
- Make sure there is sufficient access to power and cable outlets.
- Ideally, your TV should be at eye level (approximately 42” from the floor) when you’re sitting to reduce neck/back strain.
- The wall surrounding the final spot should be obstruction-free (no windows, tall cabinets, or doorways.)
Tips: Locations where glare and reflection through windows on sunny days or lamps at night should be avoided. While many homeowners are positioning TVs above a fireplace, it is not recommended unless there is a mantle or protective heat shield separating the TV from the heat of the fireplace.
Step 2: Prepare the Mounting Kit You Need

Mounting kits aren’t universal, which means that you’ll need to purchase the one that is right for both your television brand and for the weight of your flat screen. If you’re unsure of what weight or model it is, refer to your manual.
Certain brands have mounting kits that have custom dimensions for their televisions, but you can also buy kits that have weight ranges that will fit a variety of television brands. If you don't want to buy a kit, you'll typically need to have the following tools on hand:
- Drill
- Screws and a screwdriver
- Stud finder
- Pencil
- Tape measure
- Leveler
- TV bracket
Step 3: Locate the Stud

Once you’ve purchased the TV mounting kit, you’ll need to then find the stud in your wall so that your television can be hung securely. To locate the studs in your wall, use your stud finder and mark where they are with a pencil. Most mounting kits will require you to use two studs—which will only make the television more secure to the wall.
-
The edge of the studs are attached with screws directly through the drywall. For the best hold, screws for your wall mount should go in a minimum of 3/4”.
-
Interior wall studs are generally spaced 16” apart while exterior walls are spaced 24” apart. You’ll want to find the center of the stud to attach the screws. Run the stud finder left to right to mark the left edge of the stud and right to left to mark the right edge. This will help you better identify the center.
While attaching your TV mount directly to studs is the most secure method, there are a number of mounting anchors that will effectively hold the bracket (and your TV) to the wall.

Step 4: Attach the Brackets to the Television

Before you secure the television to the wall, you’ll need to attach the brackets to the television. Lay a blanket down on the floor and then carefully set your television on it, glass side down.
Follow the manufacturer’s instructions on how to attach the brackets to the television. Typically, you’ll need to locate the holes on the back of the TV and then line them up with the brackets, securing them tightly with screws.
- Make sure you ONLY use the screws that came with the mounting bracket. These are specifically designed with the proper size and length of screws to secure your TV to the wall.
- While the hole pattern on some televisions may match the VESA Mount Standard, there could be some issues with the number and depth of screw holes that are available on the back of your TV.
Warning: Using screws other than those provided with the wall mount bracket could result in the TV falling off the wall and damaging it or injuring someone.
Step 5: Measure and Secure the Mounting Bracket to the Wall

Now that the brackets are secured onto the back of the television, you are ready to measure and hang the mounting bracket that will be drilled into the wall using a drill or a driver. You’ll want to hold the mount against the wall where you plan to install it.
- Make sure the mount is level and lined up with the studs you previously marked on the wall.
- Mark the holes where you intend to drill.
- Pull the mount off the wall and hold a level along the marks to make sure your TV will hang straight.
- It’s best to put 2 holes in each of the studs (2 top and 2 bottom) to keep the mount tight to the wall.
- Drill into the studs making sure to use the level at each step.
- After the holes are drilled, attach the mount to the wall with the screws provided. You should feel some resistance as you screw into each stud. If not, you may have missed the stud.
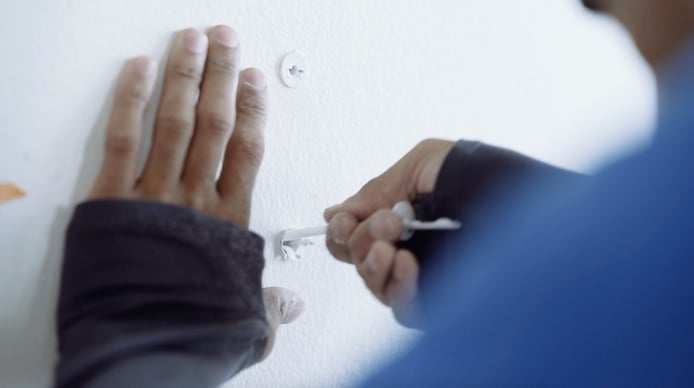
Step 6: Perform the Installation on the Drywall

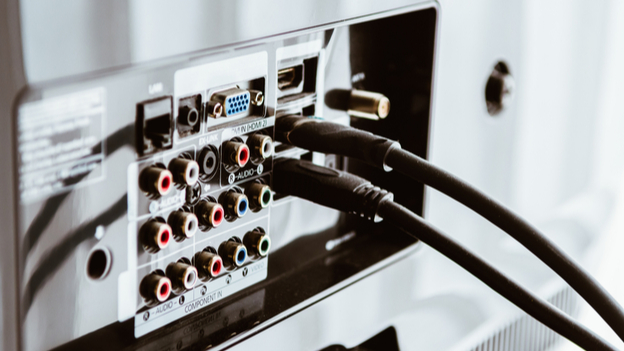
Step 7: Make Sure the Ports are Accessible
 Now that your TV is mounted to the wall, you’ll want to make sure you can get the optimum audio and video capabilities from it. Whether you’ve got a Smart TV or standard model, you’ll need to access all the ports to connect your game consoles, DVRs, computers, sound systems, media players, and streaming devices. Access to the HDMI, component, optical digital, and other ports will ensure your TV delivers the highest-quality picture and sound.
Step 8: Secure the Cables Behind the TV
Now that your television is neatly hanging on the wall, you may want to conceal the unsightly cords and cables that are hanging below it. An easy way to hide them without cutting into the wall is to use a wall cord concealer kit (also called a raceway.) Most have an adhesive backing that sticks to the wall. You can hide the wires inside and then snap the cover over them. Paint it the same color as the wall and it will blend into the background even more.
How to Find Studs in Drywall Quickly and Easily
If you don’t have a stud finder, you can quickly and easily find them by knocking on the wall. If you hear a solid sound, you’ve located a stud. You’ll hear a hollow sound between studs. If everything sounds hollow, there are no studs and you’ll need to mount your TV with drywall anchors.
How Much Weight Can a Drywall Anchor Hold?
Drywall anchors such as toggle anchors and molly bolts are designed to support substantial weight through drywall. Toggle anchors are equipped with a butterfly toggle on the end to keep the anchor from pulling out. They can hold up to 50 pounds but can be brittle. Molly bolts are more difficult to install but can hold up to 100 pounds. Always make sure to use drywall anchors with the maximum holding capacity to secure your TV to the wall.
Advantages and Disadvantages of Installing the TV on Drywall
| Pros | Cons |
| 1. Saves space | 1. Additional cost |
| 2. No size limits | 2. May come loose |
| 3. Aesthetically pleasing | 3. Difficult to access rear ports |
| 4. More flexible viewing | 4. More work to install |
Alternative to Install TV on Drywall Without Studs
No wall studs? No problem. There are a few other methods for installing your flat-panel TV on the wall.
- Drywall Anchors—use toggle anchors or molly bolts to secure your television. Toggle anchors look like regular screws but have a butterfly toggle at the end that anchors at the back of the drywall. Molly bolts come in pointed and non-pointed styles and are tapped into the wall with a hammer. The sleeve expands when the screw is tightened to secure it to the wall.
- Mounting Plates—made from metal or plywood. Placed behind the TV and attached to the wall with drywall anchors. The base of the wall mount is screwed to the mounting plate that creates a larger surface to support the TV.
- Ceiling Mount—all ceilings have beams or joists and can function like wall studs. A variety of styles are available for high ceilings with full-motion designs, swivel and full-rotation, and cable management holes.
FAQs
Can I mount a TV on drywall without studs?
Yes, you can use drywall anchor bolts such as toggle anchors or molly bolts. They can hold up to 100 pounds and secure your TV to the wall without needing wall studs.
Can the TV fall off the drywall?
Yes, there are three main reasons your TV will fall off the drywall. If you install it directly to drywall without a mounting bracket, if you don’t use drywall anchors that aren’t sufficient for your television’s weight, and if you use a poor-quality TV mount.
Can you mount a 55-inch TV on drywall?
Yes, a 55-inch TV can be easily mounted on drywall. It is a versatile size that can fit most locations, and fits the majority of wall mounting brackets for a secure viewing experience.
What is the strongest drywall anchor?
Steel hollow-wall anchors have a maximum weight limit of 100 pounds and are the strongest of all the drywall anchors.
How much weight can drywall hold without a stud?
Thin drywall that’s ¼-inch thick can hold 1.2 to 1.6 pounds per square inch and ⅝-inch thick drywall can hold 1.5 to 2.1 pounds per square inch without any extra support. Obviously, you’ll need drywall anchors to secure a television as they can weigh anywhere from 20 pounds to over 75 pounds.
Can’t Find the Studs? Need Professional Help? Puls is Here!

Our technicians can mount any flat screen television—from 31 inches to over 81—and have it ready in time for all your friends to watch the big game. Scheduling a service online is a breeze. All you need to do is go to our website, select the service and then pick a time slot that works for your schedule. A Puls technician will arrive at your doorstep within a few days, or even as soon as the very same day.
To make things even easier, we’ll also guide you on what mounting type is best for you. We can bring your choice of TV bracket (fixed, tilt or full-motion) with us as part of your appointment, so that you can choose the best option for your ideal TV setup.
Book a Puls TV mounting service today, and get ready to enjoy the ultimate weekend at home in no time.